Mary asked about resources for learning to do your own drafting. It's really handy to know how to make a block larger or smaller, when the usual pattern seems to be based on a 12" block. What if you want an 8" or a 14" block? I'm going to put in some links to books I've used to learn more about drafting quilt blocks. I'm linking to Amazon, since if it's there, I know they're still available. But if you click the link and then purchase the book, Amazon will give me a small share of the price, so know that up front.
The first one I got was http://www.amazon.com/Quilters-Album-Blocks-Borders-Identification/dp/0914440926/ref=sr_1_2?ie=UTF8&qid=1322673828&sr=8-2 by Jinny Beyer, a classic from 1986. I also took a class from her on drafting blocks back in the 1980s which was very helpful. You can see by looking at some of her quilts that she's amazing at design and drafting. Here's a link to a page of her quilts. If you click on each quilt image, you will get a bit of back story on the quilt. I have several of her books and have found them to be helpful to me on my journey to learning quilting.
Another excellent resource is http://www.amazon.com/Drafting-Creative-Quilter-Techniques-Designing/dp/157120802X/ref=sr_1_1?ie=UTF8&qid=1322673828&sr=8-1 by Sally Collins. She also has written one for folks interested in doing small quilts, http://www.amazon.com/Small-Quiltmaking-Precision-Proportion-Detail/dp/1571200096/ref=sr_1_5?s=books&ie=UTF8&qid=1322675365&sr=1-5
Her website doesn't seem to have a gallery of quilts, but if you google her quilt images, you'll find some pics.
And, if you want to take on the challenge of Mariner's Compass blocks, or other circular designs, Judy Mathieson has an excellent book that shows how to draft circular, oval, or off-center patterns. http://www.amazon.com/Mariners-Compass-Quilts-Judy-Mathieson/dp/0914881973/ref=sr_1_5?ie=UTF8&qid=1322675560&sr=8-5 is still available on Amazon, as well. To see some of her amazing quilts, visit the gallery on her website. Her quilts are amazing.
The important thing to remember when looking at these people's quilts is that they didn't make those gorgeous prizewinners the first time out--they put in lots of years of practice. But you can learn from them, as I did and continue to do.

Wednesday, November 30, 2011
Tuesday, November 29, 2011
Quilt designs are everywhere


If you look around the edges of the round motif in the floor photo, you can see several other good quilt block designs, too. Look around as you travel through your own town. How many potential quilting designs can you see in architectural details? Even man hole covers sometimes have neat designs on them. Decorative motifs are seen on old buildings, old metal fences and gates, decorative tin ceilings in old stores, they're everywhere!
Monday, November 28, 2011
Way back when...

After our son and this first wife were divorced, I got custody of the quilt. I will offer it to our oldest granddaughter when she gets her own place.
I will be leaving in a couple of hours to see our doctor and find out what will happen next to figure out what's wrong with my knee and how to fix it. The ER doctor told me to be sure and say hello to her. He used to work at the same hospital with her and recognized her name on my chart when he saw me Saturday.
Sunday, November 27, 2011
Another quilt from a class

One of the ladies in our quilt guild taught us to make this quilt in a class from a book by Nancy Brenan Daniel. I dug out a lot of batiks to make it. The leftover pieces worked as a very colorful border. In the picture, it's still just a top. I machine quilted it on one of my treadles. The center 10 blocks have a curly pattern that looks like overlapping flower petals, and the outer blocks have chrysanthemums quilted in them. The sashing and border are quilted in-the-ditch. The quilt is now on Mom's bed at the nursing home. She may forget a lot of other stuff, but so far, she remembers me finishing this quilt while she was living here with us. I think that this was the book: Nancy Brenan Daniel book
I'm getting around the house with a wheelchair and walker today. Tomorrow, I'll call Dr. Stehn and make an appointment to follow up on this knee injury. It's not as much fun as you might think, LOL. But there are some bonuses--while straightening in my office so I could sleep on the day bed instead of trying to get upstairs to the bedroom, I found some blocks from a TOGA in Seattle. Maybe I can be planning to get them put together soon.
Saturday, November 26, 2011
They say pride goeth before a fall...
And I fell this morning getting out of the shower, so will be heading off to the ER shortly. I hope to be back soon, but any prayers and positive thoughts would be greatly appreciated. I don't think anything is broken, but I felt the ligaments and stuff in my left knee popping.
Friday, November 25, 2011
Just for fun...


If you have time today, then just for fun, cut a rectangle of fabric measuring 5.5" X 3", and two contrasting 3" squares of fabric either much lighter or much darker than the rectangle fabric. Put one of the squares down with the right side of the fabric up. Fold the rectangle in half with the right side out, and place it on the square with the fold away from you, and carefully align the raw edges on the side closest to you. Then put the last square on top with the raw edge lined up at the bottom. Then take this to the sewing machine, making sure that the fold in the rectangle stays on the side furthest from you, and carefully sew a quarter inch seam along the right side of the unit. Then fold back that top square and press the seam. Now carefully open the folded fabric and press so that you have a flying geese unit, and press. There you have a one-seam 3D flying geese unit.
I learned this in a seminar from Ricky Tims, and he said he learned it from a lady in England when he was over there teaching quilting. There is a video clip on YouTube here that shows exactly how to do it, and you can see the quilt he made using this technique.
It's easy to make this in other sizes, too. The width of the rectangle will always be the same as the side of the squares, and the length will always be two times the measurement of the squares minus 1/2". As an example, if the squares are 2.5", the rectangle will be 2.5" X 4.5". Or, if the squares are 3.5", the rectangle will be 3.5" X 6.5". Have fun with this one! :)
Thursday, November 24, 2011
Thanksgiving Day.


Family is what I'm most thankful for. I wish each of you a very happy Turkey Day. :) These pics have been taken at various times, and various places, but show the people in my life.
Wednesday, November 23, 2011
One of my treasures

Several years ago, when my friend Christine still lived in a suburb of St. Louis, MO, I took Amtrak from Michigan to St. Louis to visit her and to attend a class by Caryl Bryer Fallert, who to me is one of the goddesses of the quilting world. She's a true artist. While taking the class was wonderful, being able to purchase one of the small quilts she had brought along to sell was even more wonderful. Her hand-dyed fabrics and her fabulous machine quilting on a domestic machine are amazing. If you click on the pictures, you can see more detail.
I remember the first time I saw her work up close was at the big quilt show in Paducah, KY, the year her quilt Corona II: Solar Eclipse won Best Of Show there. The quilt police were out in force. As I was standing in front of the quilt with my jaw on my chest at the amazing design and quilting, some of them came up, looked at the quilt, and in horrified tones, were saying, "But it's all just machine quilted!" I blurted out, "Yes, and magnificently!" They gave me some very cross looks and walked away muttering to each other, LOL. You can see the quilt at this link. And this link takes you to a page showing how she made the quilt, and also shows the back of the quilt, which is awesome all by itself.

This is the back of my little C.B.F. quilt, and you can see the gorgeous quilting in even more detail. I know my machine quilting is never going to come close to this, but I'm still going to try. :)
Tuesday, November 22, 2011


Monday, November 21, 2011
Another TOBE quilt top

Yesterday I mentioned putting up another picture of a TOBE quilt top--this one was made by another Treadleon member using blocks from more than one exchange, plus some extra muslin in the inner border. They're all 6" blocks. I line the way she used the Rail Fence and Half Square Triangle blocks to frame the small pieced and appliqued blocks, and the use of the half square triangles in the outer border. This is also a great example of the importance of value (light and dark) in making a pleasant design. I also am a big fan of using prints and tone-on-tones instead of using solid colors, to add lots of visual texture to the quilt. The muslin in the body of the quilt and in that inner border offer a great place to practice free motion quilting skills. I wish I could remember which member did this top. If you're listening out there, please speak up! I'd love to give credit for your work.
If you have been in block exchanges in the past, this might be a good idea for using those orphan blocks in your UFO stash. Come to think of it, I ought to take a look at my UFO stash......
If you're interested in old sewing machines, and using them to create beauty, you might like to visit a site dedicated to that-- www.treadleon.net is the place to go. Most of us do our work on treadle and hand crank machines, and keep our electric machines a secret. Sort of like that embarrassing relative, LOL.
Sunday, November 20, 2011
The Treadleon TOBE

The 6" block consists of a print fabric 6" half square triangle, a print fabric 3" square, and two 3" half square triangles of muslin. Most of the blocks use a different print for the large triangle than they do for the square, and I did the same, so the quilt is rich in color and texture. Because of the values in the blocks, and the way they are arranged, there is a strong overall design. The blocks are a bit like the Log Cabin block, in that there are many ways that they could be arranged. That is where a design wall comes in really handy, letting us play with different designs and patterns before making a final decision on the arrangement.
I used Warm 'N Natural batting in this quilt, and plain straight line quilting on my Davis Vertical Feed treadle about 1/8" away from each side of the seams, as some of the blocks had very scant seam allowances, and I wanted to anchor the seams very well.
Tomorrow I'll put up a pic of another TOBE quilt that uses blocks from more than one exchange.
Saturday, November 19, 2011
Care and feeding of old sewing machines

One of the on-line groups I belong to is www.treadleon.net and it is for people who collect and use elderly sewing machines. At one time, I had more than 100 machines. If I sent them all out for cleaning and repair, it would cost a fortune. The Treadle On folks have a wonderful habit of throwing parties called TOGAs all around the country. That stands for Treadle On Gathering and Academy. Back in 2003, I went to the River Rat TOGA in Lake City, MN, hosted by Cindy Peters. I went early, because Ray White, an OSMG (Old Sewing Machine Guru) was teaching a 3 day class on basic care and feeding of sewing machines. Ray is the only fellow in the pic above. At the time, it cost around $300, but I've saved thousands since then by being able to care for my own machines. The picture above was taken at the party where we got our certificates. Since then, I've cleaned a few machines for others and earned back the $300, so that was very helpful. The picture below is us receiving our aprons from Cindy. She has a machine that can print things on T-shirts, bags, and aprons, so fun.


I was hoping the closeup would show the picture on the apron, but it doesn't seem to do it very well. Cindy says the OSMG in our case stands for Old Sewing Machine Goddesses. Works for me, LOL.
At any rate, the point here is that well-maintained machines are a pleasure to work on, and cranky machines that are in need of a good cleaning and lube are not. Take good care of your machines.
I saw Ray in October at the ISMACS convention in Nashville, TN. He has been having a rough time since his wife passed away in the summer, so it was good to be able to give him a big hug and let him know we're praying for him.
Friday, November 18, 2011
UFOs

Most quilters have them, tucked away somewhere. Things we started at some point in the past, and just never finished. Some feel guilty that they're there, and feel that the materials used in that UFO were wasted. I disagree. Most of my UFOs were started in workshops or classes that I've taken over the years since the mid-1980s. I took the classes to learn techniques and better ways to do things. No point in re-inventing the wheel. If someone has invented a better way to do something, I'm perfectly happy to pay them to teach me how to do it. So the time and materials have been investments in my quilting education. My tuition, so to speak.
The top above came from Ricky Tims/Alex Anderson/Libby Lehman's seminar. When I got home, I decided to do the Kaleidoscope quilt. By the time I got to the point where 4 quarters of it were done and on the design wall, I realized I didn't like it. At all. So, I decided to combine two of the quarters with some of Ricky's hand-dyed fabric, and turned it into one of Ricky's Convergence quilts. I liked my Kaleidoscope Convergence quilt a lot. I added a narrow red border and the dark blue batik border. Some day I will get it quilted, but there's no hurry.
The second two quarters of the Kaleidoscope were combined with another piece of Ricky's hand-dyed fabric for another Kaleidoscope Convergence quilt, and I like this one better than the first one. It's also a UFO for now. I see a reclining woman in this one, in a vague, Picassoesque way.

Thursday, November 17, 2011

This is a quilt top I made for our younger granddaughter, who absolutely loves horses. It's still a UFO--I really need to get it to a quilter soon, before she outgrows her infatuation with equines. I found the wonderful Laurel Burch fabric on eBay a few years ago. The only problem was, the horse's eyes looked like human eyes, with white all around them, which was remarkably creepy. So I used brown Pigma pens to color in around the irises. It seemed to take forever, but the horses looked a lot better with horse eyes than with human ones. Then there was the issue of the fabrics being directional. That meant the horse pieces and the light strips with the tiny green horses had to be cut carefully, and in different directions, to make the design work. A friend had made a quilt in this pattern, and I took a good look at it to see how it was done, so that I'd be able to make one like it when I got home.

I haven't done a lot with colored pens in the past to change my fabrics, but I can see how it could really work for me in doing designs. I've been thinking about the quilting for this particular quilt. I think it would look nice with clouds moving over the surface. I may send it to a fellow member of Treadleon who lives in the DFW area (that's Dallas/Ft. Worth for non-Texans). He has a very nice longarm machine, and reasonable prices. I never want to spend too much on a quilt for the under 10 kids. It's going to live a hard life, poor thing.
Wednesday, November 16, 2011
Value changes everything.

Would you have guessed that this is the same combination of blocks as the little quilts yesterday? Look closely--it is indeed the Snowball and 9 patch blocks, but the dark and light fabrics are in different places, and the muslin has been replaced by a 1930s type lavender solid fabric.
I had a bunch of the light background 1930s prints to work with. I didn't really like them much, but when used with this lavender, they aren't bad. The little quilts look sort of like beads on sticks to me, but this one looks like lavender lozenges. The 9 patches in the body of the quilt have 5 lavender squares and 4 print squares. In order for them to flow into the border, the 9 patches in the border have 5 print squares and 4 lavender squares. I donated this top to the guild and someone else quilted it for the Fire Quilt collection.
Here's a pic to show more clearly how the border works with the rest of the quilt top:

And you can also see a bit of my full-spectrum fluorescent lighting, LOL.
There are a lot of other options for value placement for this combination of blocks. You can see some of them by Googling "Snowball and 9Patch quilts".
Tuesday, November 15, 2011
Combining two simple blocks

In the Midsummer Night's Dream quilt, I combined 3 different blocks (none of which were simple) to make the center medallion. You can also combine just two simple blocks to get a really neat design. I made a couple of baby quilts a few years ago that illustrate this, combining a simple snowball block (only 5 pieces) with plain old 9 patch blocks. I used 1930s reproductions and muslin. To make the Snowball blocks, I cut 25 6.5" squares of the repro fabrics and 100 2.5" squares of the muslin. I put a square on the corner of the large square and sew from corner to corner on the little square. I trimmed the muslin square to 1/4" seam allowance, but didn't cut the repro fabric off--I found my blocks were more accurate if I left them on. Since I planned on machine quilting, having the extra fabric there wouldn't interfere. For the 9 patches, I cut strips of lots of the repro fabrics and the muslin, and sewed them together with 1/3 being muslin-print-muslin, and the rest print-muslin-print, pressed all the seams toward the colored fabric, then sliced them up with a rotary cutter, and stitched the little 9 patches together. I made plenty of them, so there were enough for two baby quilts. The one above was given to our little grandson, William Caleb. The one below was given to a little girl baby of a co-worker.

Using the cooler colors seemed to work well for a boy, and the warmer colors for the girl turned out quite pretty.
To use different blocks together, it seems to work best if the blocks have the same number of divisions in the pattern. For instance, both of these blocks are evenly divisible by 3, basically 9 patches. You could also use two different 4 patches, 5 patches, etc. More on this tomorrow.
Monday, November 14, 2011
Sometimes life is hard
My 91 year old Mom, who decided last April that she wanted to move to the nursing home and had picked it herself, is really going downhill in the last few weeks. She thinks she's in Traverse City, MI most of the time, and is upset that someone took some of her furniture and moved it to this room she's in now. Her short term memory is just about gone now. It got me thinking back to when she was 75. She and Pop were on the way to a dance when she started feeling horrid. Pop had to stop the car so she could upchuck. Instead of the dance, Pop drove her to the ER, where they determined that she was having a heart attack. Within a day or two, she was in the operating room, having a quadruple bypass. I will never forget the surgeon coming out after the surgery to tell us it was going to be a while before we would know if she would make it. He said that she had the tissues of a 90 year old, and that it was a race throughout the surgery to get a stitch taken before the previous stitch pulled through the fragile vein/artery walls. He also said she had the worst lungs he had ever seen--mostly big air spaces, not much alveolar tissue for gas exchange. Pop made me promise that I wouldn't ever tell Mom what the doctor had said. I went home that night and finished cutting out pieces for a quilt that I had wanted to make for a few years, and prepared to spend lots of time with Mom in the hospital and at their apartment.

One of my quilting friends had an old book with quilt pictures in it that included this block, which was not named. To me, it was like a more sprightly version of the Seven Sisters block, so I called it Seven Dancing Sisters. I had sketched it from the book, and had spent many long hours drafting it and saying bad words until I got it right. So, I had the hand piecing to help keep me sane during the long hours sitting with Mom, sleeping in a recliner next to her bed in the hospital many nights. I slept on the couch in their living room for a few weeks after she went home, making sure my Mom ate enough to provide fuel to her body to heal. She had lived on about 800 calories a day most of her adult life, and was so afraid she might gain weight that I had to get really firm with her about eating. She introduced me to her friends and neighbors as her Nazi Nurse, LOL. Then, she had a setback--an infection had settled under her sternum. I had been back home for less than two weeks, and had to pack up and head back to Grand Rapids. The sternum had to be removed. This left a deep hole in her chest, and when the nurse was changing the dressing, I could see mom's heart beating under a thin layer of tissue. It was pretty horrid. She was in the hospital on IV antibiotics until it had healed enough to have a plastic surgeon fill in the hole with muscle from her left pectoral and her abdominal muscles, and graft skin over it. All this time, I was piecing the blocks for the quilt. This took up most of the summer of 1995. I completed 7.5 of the blocks. After Mom was finally well enough to be on her own with Pop again, I put the blocks away. I couldn't bear to look at them for about 10 years. Then I finished piecing the blocks, made the setting strips, put the top together, and sandwiched it. I did some straight line quilting on the setting strips, then once again put the quilt away. A few years later, I swapped a vintage sewing machine to a friend to have her finish the quilting on her longarm. She did a lovely job. The detailed quilting in the stars and the background behind them doesn't show up in the pic above, unfortunately. Now the quilt lives on DH's bed. :)

One of my quilting friends had an old book with quilt pictures in it that included this block, which was not named. To me, it was like a more sprightly version of the Seven Sisters block, so I called it Seven Dancing Sisters. I had sketched it from the book, and had spent many long hours drafting it and saying bad words until I got it right. So, I had the hand piecing to help keep me sane during the long hours sitting with Mom, sleeping in a recliner next to her bed in the hospital many nights. I slept on the couch in their living room for a few weeks after she went home, making sure my Mom ate enough to provide fuel to her body to heal. She had lived on about 800 calories a day most of her adult life, and was so afraid she might gain weight that I had to get really firm with her about eating. She introduced me to her friends and neighbors as her Nazi Nurse, LOL. Then, she had a setback--an infection had settled under her sternum. I had been back home for less than two weeks, and had to pack up and head back to Grand Rapids. The sternum had to be removed. This left a deep hole in her chest, and when the nurse was changing the dressing, I could see mom's heart beating under a thin layer of tissue. It was pretty horrid. She was in the hospital on IV antibiotics until it had healed enough to have a plastic surgeon fill in the hole with muscle from her left pectoral and her abdominal muscles, and graft skin over it. All this time, I was piecing the blocks for the quilt. This took up most of the summer of 1995. I completed 7.5 of the blocks. After Mom was finally well enough to be on her own with Pop again, I put the blocks away. I couldn't bear to look at them for about 10 years. Then I finished piecing the blocks, made the setting strips, put the top together, and sandwiched it. I did some straight line quilting on the setting strips, then once again put the quilt away. A few years later, I swapped a vintage sewing machine to a friend to have her finish the quilting on her longarm. She did a lovely job. The detailed quilting in the stars and the background behind them doesn't show up in the pic above, unfortunately. Now the quilt lives on DH's bed. :)

Sunday, November 13, 2011

So, yesterday I had gotten as far as having enough of the piecing done to cover the oversized flannel pattern pieces. The next step was to baste them together well enough that things weren't going to shift around during the quilting process. Since I planned on a lining for the coat, I wanted to just quilt the flannel to the pieced fabric. I also wanted to use the Mettler hologram thread, for lots of glitter. I had found in other projects that I didn't like using it on the top, since it tended to shred and break often enough to inspire me to new levels of creative cursing, so I decided to mark the quilting lines onto the flannel, put the hologram thread into the bobbin, and quilt from the back. I used my spiral template to mark the quilting lines, using it so that some of the spirals appeared to be behind the others. You can see the quilting in the closeup above. When I started the project, I had copied my size of the pattern on Do-Sew and cut it out. So now I pinned the pattern pieces onto the quilted pieces and cut out the jacket pieces. After sewing them together, I made a lining from one of the batiks in the pieced part, and put it in. I named the jacket "Under the Sea". It got juried into the show in Houston several years ago. It didn't win anything, but just having something juried in is SO exciting. I don't think it would ever get old. The judge's comments said it had too many colors in it. But since I love lots of color, I just figured that when we enter something in a show, we pay for the judge's opinion, and that's what we get. :)
Wearing quilted garments has pretty much gone out of style, it would seem, but I still wear this jacket to quilt shows. It's my Circus Pony gaudy glittery fun jacket. And I wear it with my Laurel Burch socks. :)
Saturday, November 12, 2011
Adventures with quilted clothing
I'm not much of a one for doing clothing. A garment has to curve around a body. Quilts are so much simpler--they just have to lie flat. My mom was an excellent seamstress in her day--she could use the Vogue designer patterns. I couldn't even read their directions. :o But, I bought a lovely batik panel with fish on it and a packet of nine smaller batik squares with sea creatures at the Houston show one year. So, I set out to make a swing coat that just had 2 pieces--front and back. I can't remember now where the pattern came from, but it was a multi-sized one suitable for us fluffy ladies. It's probably still in my messy studio somewhere.


A few years earlier, I had purchased a kit for doing marbled fabric at the show in Paducah, after I took a workshop on doing it at my quilt guild in Kalamazoo, MI. When I got home with the kit, I called Agnes, the friend who quilted A Midsummer Night's Dream (the quilt from yesterday) for me, and we spent a lovely afternoon doing small pieces of marbled fabric. I could see why it's so expensive to buy! It's very labor-intensive, and the materials are costly. At any rate, when I decided to do this coat, I dug out all the marbled pieces, lots of batiks, and the panels. To give more interest to the large back panel, I sliced across it with a rotary cutter and sewed two 1" strips of black fabric in to make a 1/2" line through it, then sliced it the other way and sewed in three 1" strips crossing the first ones. It was a bit finicky, making the severed fish bodies match up, but I liked the effect. Instead of batting, I cut up an old flannel sheet into two fronts and a back, making the pieces extra big to allow for shrinkage as the quilting happened, and stuck them up on the design wall. Then I began building the fabric. I made some wonky 9 patches, cutting the fabrics on angles to sew together, and added triangles to them and to the 9 little batik panels, tossed in lots of other shapes to bring the pieces together, and eventually had large enough fabric pieced to cover the flannel pieces. Tomorrow I will discuss the quilting and construction of the coat.
Thursday, November 10, 2011
My first big quilt show
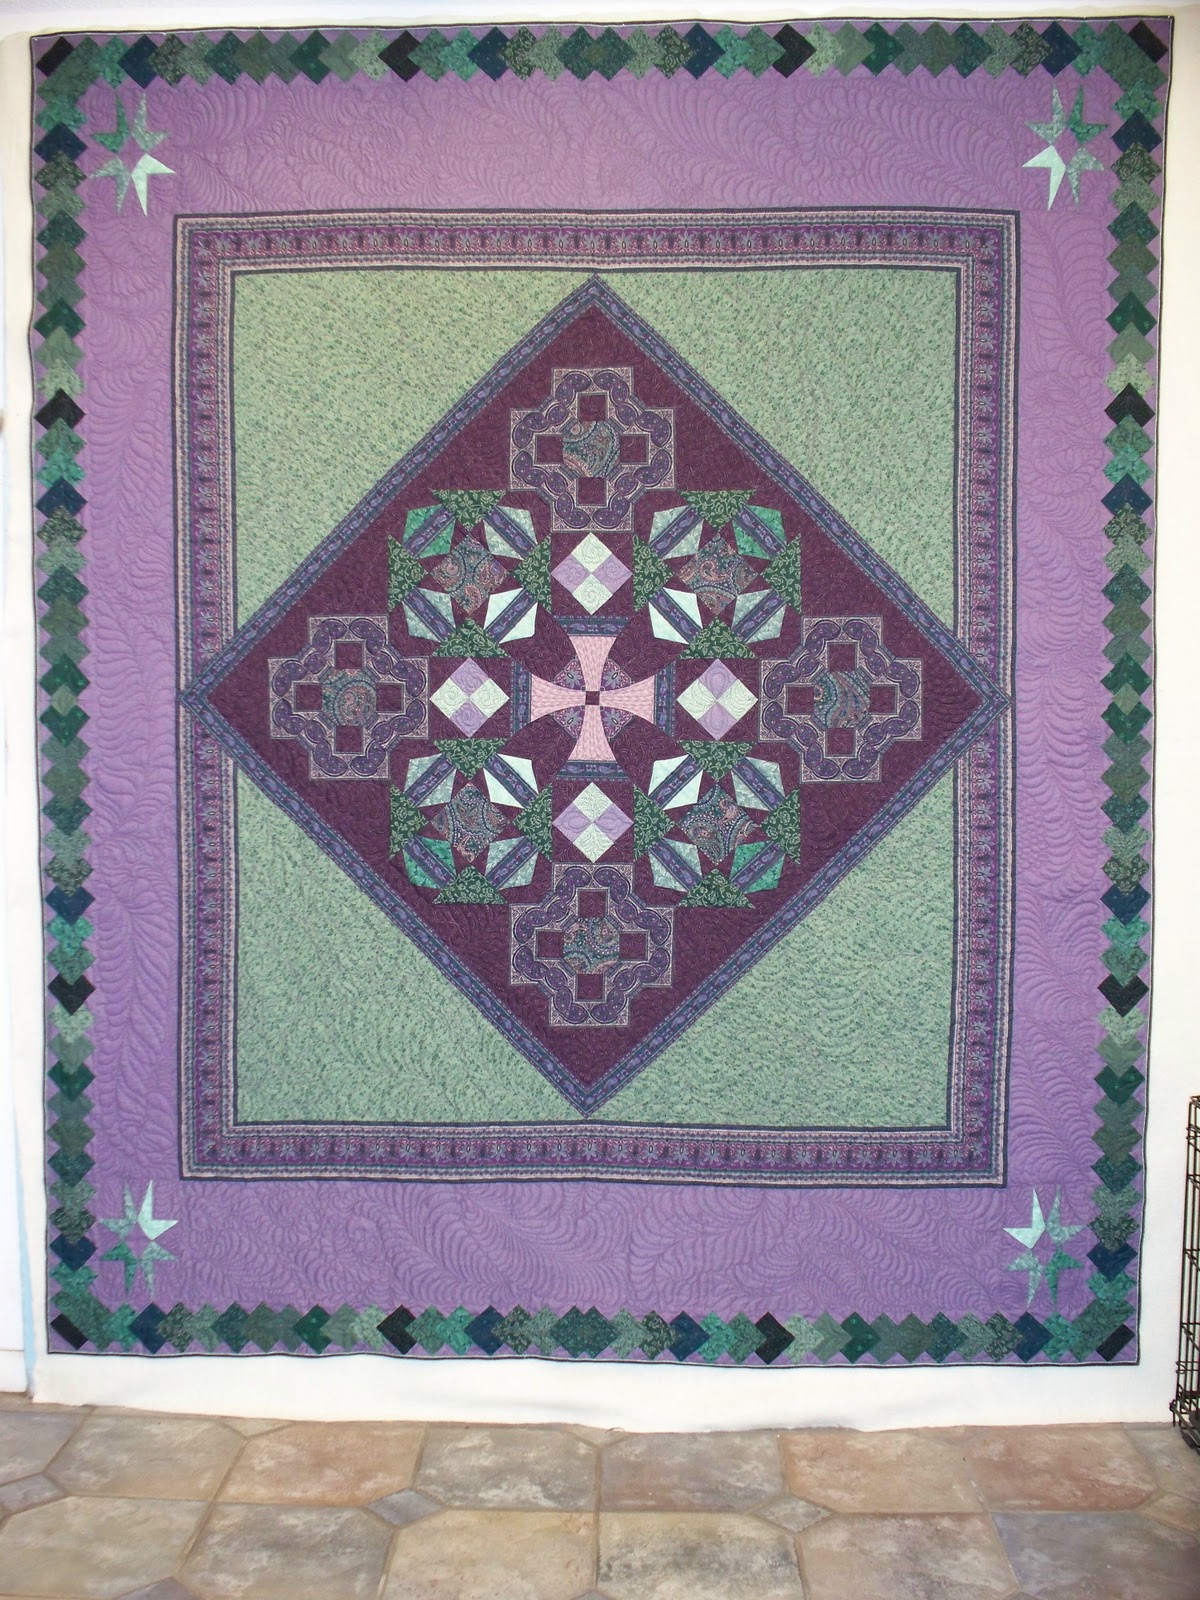
Way back in the mid 1980s, I went to my very first Paducah quilt show. Those of you who have been there know just how awe-inspiring that was. The quilts just knocked my socks off. The vendors were wonderful. And Hancocks of Paducah! That was like dying and going to heaven! At the time, we were still using a credit card, and I think I wore the magnetic right off it. I came home with lots of Jinny Beyer fabrics, and with this quilt in my head, just waiting to be drafted. I wanted to explore using the stripes in pieced blocks, and using fabric value to try to give the impression of light moving across the surface of the quilt. I used 3 traditional blocks for the center medallion and put the whole thing on point. Then I found that really neat border that looks sort of like the Card Tricks block, in one of Jinny Beyer's books, and used a lot of different greens to piece that. It sat around a few years as a top, because I couldn't come up with a good way to quilt it. Eventually, I had a friend quilt it for me with her new longarm machine. She did all those lovely feathers freehand. She's a real artist. The quilt went to some shows, didn't win in the big ones, but did in some smaller ones.
One of the things I learned while doing this quilt was how to elongate a pattern for the corner stars in the border. Easy Peasy if you have graph paper. I love graph paper. Another thing was how to make sure the striped fabric comes out matching in the corners, thanks to a handout from Jinny Beyer's class. And that someday I want to do a whole quilt using that center block, Royal Star. Using mirrors, I could see that it would make a really nifty overall design. Then when I got my EQ program, I could put them together on that to see how effective it was. So many quilts, so little time.....
Here is a closeup to show the quilting, the use of stripes in the block, and the border. I love the border, but it was a pain in the whatchamacallit to piece.

Last year, our quilt guild was short on Fire Quilts (we give quilts to families that have been through house fires) so I donated this one. I understand the family that got it liked it.
ETA, the quilt was named A Midsummer Night's Dream, since the illusion of light behind the center and in the corners reminded me of moonlight coming through leafy tree branches.
Wednesday, November 9, 2011
The Studio


These pictures were taken way back in 2006. It's a lot messier now. The secret to having a nice tidy studio is to invite your quilting buddies over to visit, because then you have to clean it up. The last 3 years have largely been spent dealing with family health issues, so the mess has increased exponentially. I guess I need to set a date for an open house early next year, to encourage myself to reduce the chaos.
The top picture was taken standing in the doorway to the kitchen. You can see a bit of the design wall on the left, 3 of the fabric cabinets (the other 12 are behind, in two rows of 3, with two rows of 3 further to the right and not visible in this pic. The three you can see are, left to right, brown/tan/rust fabric, black/gray fabric, and white/light/neutral and oriental fabric. It's difficult to see, but on the side of the right cabinet, there's a pegboard with all the rulers, tools, and gadgets for quilting hanging on it. The two treadles closest in the pic are industrial models. The one on the left was made in 1913, and the one on the right was made in 1892. The treadles behind them are all made for domestic use.
The next pic down is also taken from the kitchen doorway, and shows the middle of the room. There are 6 fabric cabinets behind the shelves on the right. The batting on top of them is apparently trying to make a break for it. Those shelves hold some sewing stuff, and quite a lot of sewing machine stuff--attachments, etc. In front of the shelves you can see my cutting table---an old wooden table that a friend gave me. Bill raised it to a good height for me to cut--his solution isn't pretty, but it works, LOL. I have a cutting mat that covers the entire top of the table. Underneath are two steel cabinets with quilting books, patterns, etc. stored in them. In the foreground is another treadle, and a high stool with fabric, etc. piled on it. In between the storage cabinets on the left and the shelves with cabinets behind them on the right, you can see a wooden drying rack. Those are really handy when cutting and sorting strips.
The third pic is again taken from the kitchen door, to the right side of the room. Another treadle is seen in front of the shelves with my hand crank sewing machines.
Picture four is taken standing between the fabric cabinets and shelves, and shows the right side from that viewpoint. The door out to the screened porch is visible, and the ironing board. Right across from them is the washer and dryer. To the right of the door is the design wall, made of two 4' X 8' slabs of blue foam insulation board covered with flannel. Quilt pieces and blocks will stick to flannel quite nicely when working on a quilt, and when I start sewing stuff together and it gets too heavy to stick well, it's easy to pin into the foam to hold the piece in place.
Picture 5 is from the same vantage point, and looks straight back to the kitchen door. You can see several more treadles. The round things hanging on the wall to the right of the door are Boye sewing machine needle display cases. They would have been found in dry goods stores, and held needles and shuttles for old sewing machines. The needles and shuttles are in cute little wooden tubes, with wooden tops. To the left of the door is my workbench with my tools for working on old sewing machines. In the foreground is the cutting table.
Picture 6 shows the left side of the room. You can see the whole cutting table, and one of the cabinets underneath. The door to the front porch is visible. You can see another of the round needle display cases sitting on the cutting table.
You can't see the light fixtures in the pics, but when we moved in, I had an electrician put in 6 fixtures, each one holding 4 fluorescent lights. I had him order full-spectrum light tubes. I can turn on one side at a time, or both sides. When all 24 lights are on, it's like high noon in there even in the middle of the night, LOL. The best part is that the colors look true, under those lights, just as they will in ordinary daylight.
In pictures 1 and 3 you can just barely see a bit of the huge triangular window at the top of that wall that reaches all across that end of the room.
What is your studio like?
Subscribe to:
Posts (Atom)